Awesome Git
Best Pratice for Git
git config --global core.editor "nvim"
git config --global user.name "hotchilipowder"
git config --global user.email "h12345jack@gmail.com"
git config --global pull.rebase true
git config --global credential.helper cache
设置默认的编辑器
设置默认的用户名和邮箱
设置拉取合并行为
设置Git凭证管理器
多账户快速工作流
如果你是一个主账户 + 多个项目账号的模式,建议优先用下面这个流程:
# 1) 非默认账号仓库,clone时指定用户名,避免走错凭证
git clone -c credential.helper=  -c credential.username=xxx https://github.com/xxx/demo.git

# 2) 进入仓库后设置本地身份(只作用当前repo)
cd demo
git config --local user.name "xxx"
git config --local user.email "xxx@example.com"
git config --local credential.username "xxx"
这个方式的好处:
git history更干净(每个repo身份明确)
git push 和 git pull 不容易出现账号问题
注意
credential.helper store`将会存放到本地的文本文件中,这是一个比较危险的事情。 也就意味着需要你保证本机的安全。 `~/.git-credentials
On Mac, Git comes with an “osxkeychain” mode, which caches credentials in the secure keychain that’s attached to your system account.
git config --global credential.helper osxkeychain
Linux
Windows
账户设置
之前在Mac用多个账户,经常出现要么不能git clone私有项目(因为是另外一个账户),要么错误的用了账户到别的repo中,并且一直管理上比较麻烦。
有如下的方案:
方案1: 不配置global
方案2: 配置global, 默认使用hotchilipowder的账号。
方案1的版本中,需要按照如下的方式清除默认的 credential.helper 。 对于
git config --global --unset credential.helper
对于方案2,在进行拉取非默认账号的项目的时候可能会报404,使用如下的命令:
git clone -c credential.helper= -c credential.username=xxx https://github.com/xxx/xx
我自己目前常用的多账户开发方式如下:
主账户继续用global配置(默认账号)
非默认账号仓库,clone时临时指定credential.username
clone后在repo里设置local的user.name、user.email和credential.username
git clone -c credential.helper=  -c credential.username=xxx https://github.com/xxx/demo.git
cd demo
git config --local user.name "xxx"
git config --local user.email "xxx@example.com"
git config --local credential.username "xxx"
这样做的好处是:
git history 更干净(每个repo用对应身份)
git push 和 git pull 不容易出现账号问题
My Github Issues
MacOS osxkeychain
Mac 上清除 git osxkeychain 保存的登录名密码
git config --local --unset credential.helper
git config --global --unset credential.helper
git config --system --unset credential.helper
但是还有进一步删除这个文件下的配置, more detail see this link
git config --show-origin --get credential.helper
How to change default editor into vim
不太习惯使用 nano, 默认的nano比较难搞,改成 vim
git config --global core.editor vim
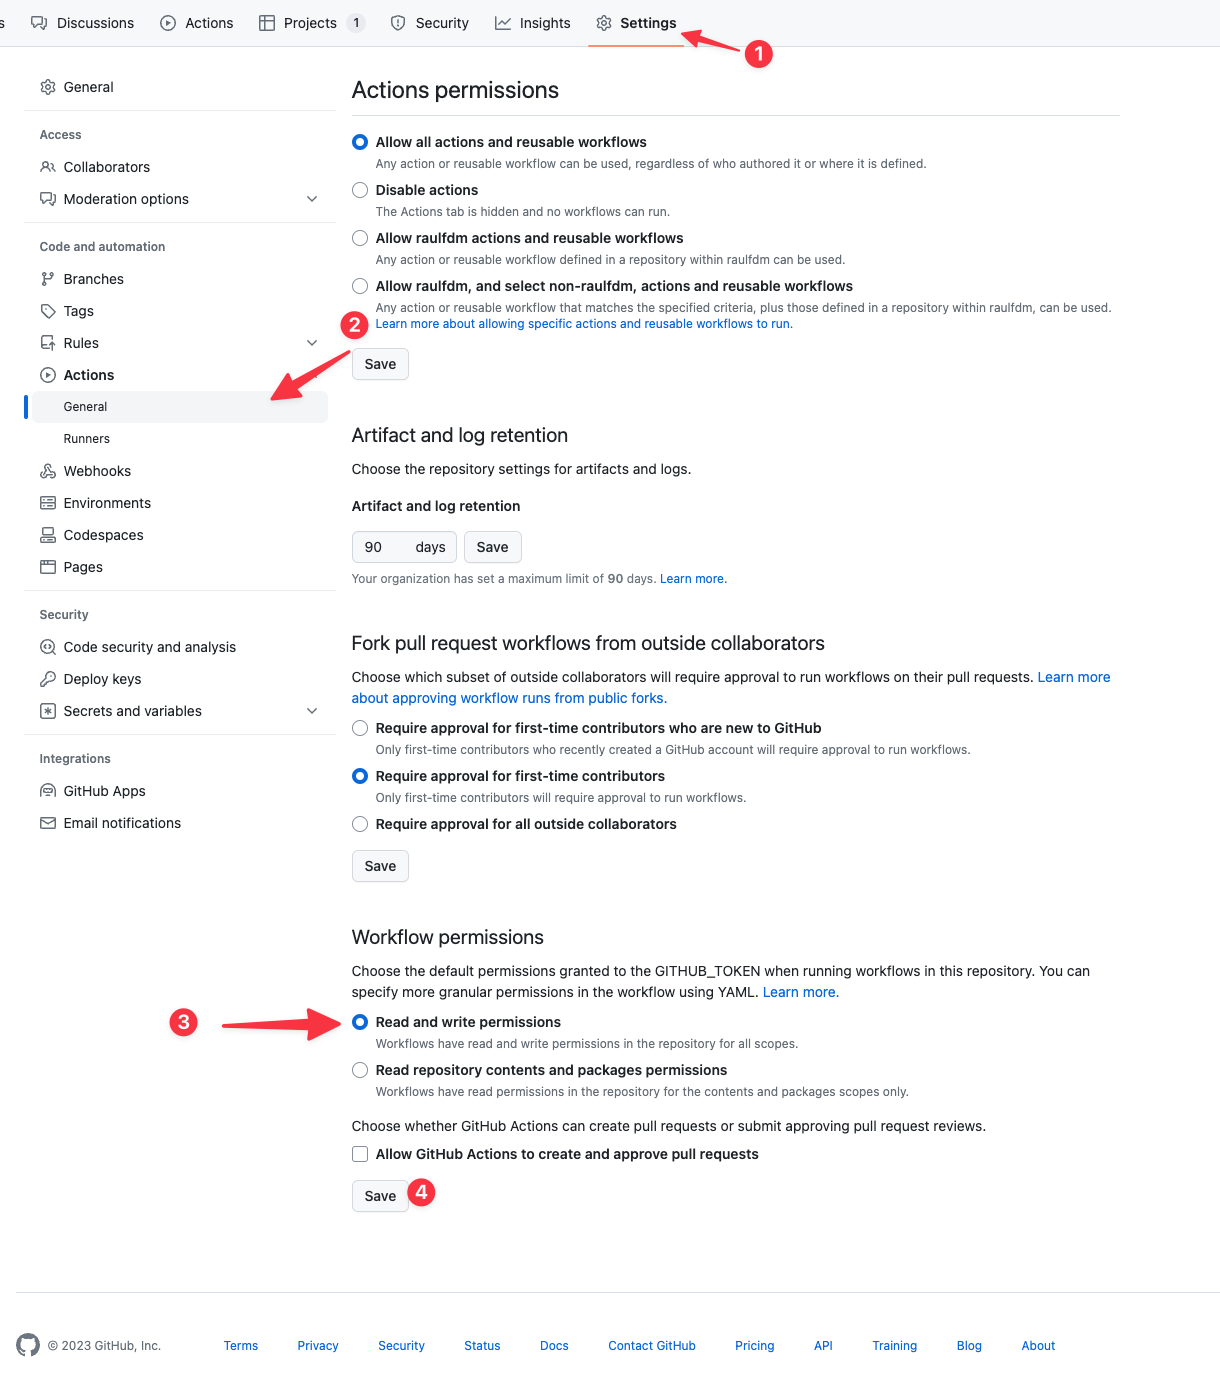
Permission to x denied to github-actions[bot]
遇到“Permission to "x" denied to github-actions[bot].”问题,按照下面的方法进行处理, see this link
Github Save username and password
由于经常有开项目的习惯,存在多个账号,所以建议先设置local的 user.name和 user.email,并且进一步设置, 当前的项目的存储方式,这样可以少输入密码
git config --local user.name "hotchilipowder"
git config --local user.email "h12345jack@gmail.com"
git config --local credential.helper cache
具体这些字段将会被写入到 project_xxx/.git/config中,
例如:
[user]
     name = hotchilipowder
     email = h12345jack@gmail.com
[credential]
     helper = cache
Config
Command |
Meaning |
Note |
|---|---|---|
|
修改编辑器为Vim |
|
|
修改cache过期事件为1周=60 * 60 * 24 * 7 = 604800 |
|
|
设置默认的本地的crediential的username,避免每次都要重复输入。 |
No Password
Install
apt install git-all
see this link for recent release.
apt-get install dh-autoreconf libcurl4-gnutls-dev libexpat1-dev gettext libz-dev libssl-dev

cd tmp
curl -OL https://mirrors.edge.kernel.org/pub/software/scm/git/git-2.38.5.tar.gz
tar -xvf git-2.38.5.tar.gz
./configure --prefix=$HOME/.local
make && make install
brew install git
Proxy
Just set following cmdline:
git config --global http.proxy http://xxx
git config --global https.proxy http://xxx
Common git skill
关于git学习的资料,可以查看 git教程
Git Restore
git restore是较新的撤销命令,用于恢复工作区和暂存区文件,比 git checkout -- <file>语义更清晰。
常见用法:
# 丢弃工作区改动(未add)
git restore <file>

# 丢弃目录下的工作区改动
git restore path/to/dir

# 取消暂存(从staged放回工作区)
git restore --staged <file>

# 同时撤销暂存和工作区改动
git restore --staged --worktree <file>

# 从某个commit恢复指定文件
git restore --source <commit> <file>
注意:git restore只影响当前文件状态,不会修改已经存在的commit history。
Change history user.name and user.email
这个需求我主要是多设备没设置user.name 或者 user.email导致有一些奇怪的用户出现在git history里面了。
#!/bin/sh
git filter-branch --env-filter '
OLD_EMAIL="you@example.com"
CORRECT_NAME="hotchilipowder"
CORRECT_EMAIL="h12345jack@gmail.com"
if [ "$GIT_COMMITTER_EMAIL" = "$OLD_EMAIL" ]
then
    export GIT_COMMITTER_NAME="$CORRECT_NAME"
    export GIT_COMMITTER_EMAIL="$CORRECT_EMAIL"
fi
if [ "$GIT_AUTHOR_EMAIL" = "$OLD_EMAIL" ]
then
    export GIT_AUTHOR_NAME="$CORRECT_NAME"
    export GIT_AUTHOR_EMAIL="$CORRECT_EMAIL"
fi
' --tag-name-filter cat -- --branches --tags
当然,为了避免这些,最好还是设置一下 user.name和user.email.
git config --local user.name "hotchilipowder"
git config --local user.email "h12345jack@gmail.com"
Delete all history
这个需求比较常见,因为有些commit history确实不想让人看到,很愚蠢
git checkout --orphan latest_branch
git add .
git commit -m "Update"
git branch -D main
git branch -m main
Lazygit
Lazygit is a simple terminal UI for git commands.
Github Action
首先,github action 已经成为了软件开发领域不可获取的部分。
关于 Github Action 文档学习,
首先,需要创建 .github/workflow/xxx.yml目录文件。
下面是我在用的一些 Github Action
My config
mkdocs.yml
name: GitHub Pages

on:
  push:
    branches:
      - main
jobs:
  publish:
    name: Deploy Site
    runs-on: ubuntu-24.04
    environment: github-pages
    steps:
      - name: Checkout Repo
        uses: actions/checkout@v3

      - name: Setup uv
        uses: astral-sh/setup-uv@v6

      - name: Install
        shell: bash
        run: |
          uv pip install --system -r requirements.txt
          sphinx-build -b html docs build

      - name: Make snippets to rst
        shell: bash
        working-directory: snippets
        run: |
          python3 snippets.py

      - name: Deploy Website
        uses: peaceiris/actions-gh-pages@v3
        with:
          github_token: ${{ secrets.GITHUB_TOKEN }}
          publish_dir: ./build
本项目使用的github,其主要包括以下功能:
安装依赖+构建文档
Make snippsts to rst
push html to github page
Self-hosted Action
最近,得知了Github Action可以Self-hosted了。基于这个特性,将会非常好的使用Github Action去替换Jenkin。
具体的步骤主要是按照要求进行安装即可。